Showing posts with label car part. Show all posts

Parts Avatar Canada would help you to learn how to change the Spare Wheel.

How to change a Spare Wheel
It won’t be a tough task to change the wheel at the side of the road if you know how to change it. Your car can get puncture at any point of the day or night without giving any warning. Even if you are sure that you can fit the extra wheel all by yourself, it can set your journey back and would cause you some extra hassle as well.
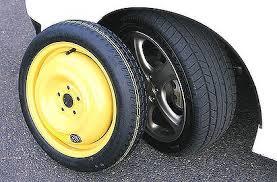
But if you don’t know how to fit the spare tire, then the situation can be even more irritating as all you can do is to wait for the mechanic to arrive and complete the task for you. So if you will learn how to change this car part, it would save your time as well as a lot of money. Before knowing how to do it, here are some precautions you should take.
  1. Keep your spare wheel ready to use
If you get a puncture, then it would be extremely demoralizing to find that the spare wheel is flat and its rubber is old and perished. So make it a point to get your spare wheel’s tyre pressure checked along with the other ones. You should do this every couple of months.  Always inspect your spare wheel to check that the rubber is in good condition or not.


  1. Never change a wheel on the motorway
It would just take a fraction of seconds for some careless driver to wipe you out of the road, so always use your mobile phone to call for a recovery service. It would help you to move to a safe place before you start doing any work on your car. This is one important breakdown tips.
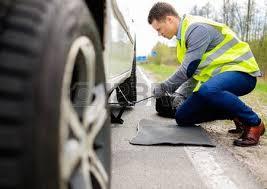


  1. Use a puncture repair kit
There are some cars which do not have a spare wheel, but they have a puncture repair kit and a compressor that would help you to pump the tyre up again.


  1. Be careful
When you change a tyre, it involves raising it onto a jack. Be careful and sensible while doing this and always refer to your car’s manual or you can even seek the help of a professional. Take full precautions as if the jack falls over while the car is on it, then it can cause damage to the car and even you can get injured.
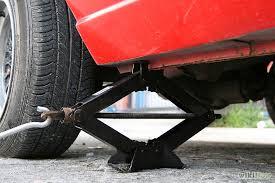

Still wishing to learn how to change the wheel? Read the points mentioned below:
  1. Make sure the car is on flat, hard, level ground
You are going to jack up your car, so make sure that it is totally safe without your car falling off the jack.  Check that your car is properly levelled and there are no lumps as two of the wheels of the car would be lifted off the ground. Also check that the ground is firm and would support the weight of the car when lifted.


  1. Check you have the key for your locking wheel nuts
There are some cars which are fitted with locking wheel nuts, so first of all you will have to find the locking wheel nut key. You can find it easily in the glove compartment, in the side pockets or near the spare wheel. It will resemble a socket from a socket set. It would completely fit into your wheel nut.


  1. Check the manual
It would be really helpful if you have your car’s manual. With its help you will get to know the location of your car’s wheel brace and how to use them. Learn how to position the jack properly so that you can lift the car gently without damaging it. With its help you will get to know where your spare wheel is and how to remove it.


  1. Make sure that your car doesn’t move
Do you want your car to roll away while you are changing the wheel? Of course not! Don’t forget to put your handbrake on and there are two ways to make sure that it doesn’t happen.
Firstly, select the first or the reverse gear of your car and at that time the engine should be turned off. There are some automatic cars, if you have one then put it in ‘park’ or ‘P’.  The reason behind this is that the handbrake operates on two wheels.
Secondly, try to block your car physically so that it does not move. Try to figure out which wheel is diametrically opposite to the one you are replacing. Then all you have to do is to find two rocks and some bricks and carefully place them in front and of behind that wheel.


  1. Loosen your wheel nuts
You must loosen the nuts or bolts that hold the wheel you want to change before you jack the car up. It is because it would be extremely tight and when the wheel is in the air, it would just spin in freely whenever you will try to loosen it. Connect your car’s wheel brace to the nuts and bolts and then turn.  Position the wheel brace in such a way that you can push its handle using your foot and you can also use your body weight by standing on it. The nut or the bolt would then start to move and then you will be able to turn the wheel brace by hand to loosen it.


  1. Find the car’s jack
Your car jack is generally located in the boot.  Search it in the side panels or under the boot floor. You can even find it under the bonnet in some cars. As soon as you find it, remove it from the car.


  1. Find the car’s spare wheel
So now is the time when you should take out your spare wheel and then place it gently on the ground near your car. Many people keep the spare wheel in the compartment below the boot floor. If there is any doubt, then you can always refer to your owner’s manual.


  1. Position the jack beneath the car
For this part you will have to check your car’s manual. With its help you will get to know that where you should actually position the jack. Usually it is placed beneath the front or rear window.


  1. Jack the car up
Wind the jack up by following the instructions in the user manual. You can either connect the wheel brace to a nut on the jack or the jack may have a built in handle which you can use. Keep on winding until the wheel you wish to replace is clear of the ground.


  1. Remove the wheel with the punctured tyre
The time of taking the wheel off the hub has arrived. The nuts and bolts are removed with the help of wheel brace. Then slide the wheel off the hub. Be extremely careful as it would be heavier than you think.


  1. Locate the spare wheel onto the hub
It would be very easy if your car’s wheel is fastened with nuts. When you have to hang the wheel on the hub, then it would be a nice idea to have a friend or passenger with you to help you supporting the weight of the wheel.


  1. Secure the wheel
Carefully screw all the nuts and bolts back on.  Ensure that all the nuts and bolts are finger tight.


  1. Jack the car down
Earlier you raised the car up and now you have to reverse that procedure. Wind the jack down until the car is once again resting on all four wheels.


  1. Tighten the wheel
It is now very important to use the wheel brace for the purpose of tightening up the wheel nuts or the bolts. Tighten them up as hard as you can by using your hand and then you can use your foot to push the wheel brace even further round.


  1. Clear up and hit the road
Place your old wheel back in the car. Don’t forget to remove the rocks or the bricks from the wheels.  Now you are ready to get on the road once again.
https://partsavatar.ca/ offers wide range of auto body parts to its customers. The products which we have are best in quality and easily affordable. So don’t miss this exciting chance and visit us as soon as you can.

Are you hearing a nasty screech? Visit Parts Avatar to buy perfect car brakes and change them on yourself !!

Are you hearing a nasty screech? Learn how to change your car’s brake all by yourself
Whenever you press the brake pedal in your car, do you hear the sound like monsters are playing the loudest music every time you need to slow down? Well, this is the time to change your car brakes.
Working of a car brake system
One of the most important components in your driving experience is a car’s braking system. This car part would protect you from smashing into the bus which is in front of you full of people. This is a basic hydraulic system which allows you to apply force at the pedal which would be translated into clamping force at the wheel.
How would you know that it is the correct time to change the Car Brakes?
Whenever a brake pad would wear down, it would often make a squeaking sound when applied. After hearing this, the driver knows that it is the time to change the brakes soon. Many new cars have evolved which have brake pad sensors already installed in their system. If your brake pads are low, then you will be able notice a change in your brake fluids level.
How to change the car brakes?
You can change your car brakes with regular hand tools in your garage. The first step is to acquire the following tools:-
  • Ratchet
  • Breaker bar
  • Sockets
  • Wrenches
  • Jack stands
  • Gloves
You must choose ceramic brake pads as they would provide you with the best brake feel and the longest protection against brake fade. But a little more dust would be accumulated on your wheel then conventional pads. Now if we talk about rotors, any cheap rotor would work. Choose the rotor which suits you best.
Loosen Lugs
If you want to buy the best front lug nuts, then engage your emergency brake and then turn the counter with the car on the ground. Don’t forget that you are just loosening it up and not removing it.  Use a regular ratchet to take off the loose lugs. If you are working on the rear, then you must put the bricks behind the front wheels and apply parking brake so that you can remove the lug nuts easily. Once the wheel is off, then you can remove the parking brake.
Raise the Car
Put your hydraulic jack underneath the car’s frame. There are some cars which have black rubber pads that serve as the jacking points. Place the jack stand under the car, allow the car to rest on jack stands and make sure that its weight does not shift. Now you can remove the wheels. This is a great time for you to clean all your wheels which are covered with brake dust.
Loosen Caliper
There are some bolts on the caliper. Remove the bolts carefully and then the caliper would be able to slide out. Use a screwdriver to pry out the caliper. Allow the caliper to rest on the suspension and don’t put any strain on the brake.
Remove Caliper carrier
There are two bolts on the rear of the hub that keeps the caliper carrier on. They are tight, so you can always use a breaker bar.
Remove the Rotor
Whack the rotor with a hammer and then it would come out. There are some rotors which have a screw, which should be removed first and only then a rotor would come out. If the car is old, then it must be covered with rust, which can be an issue. So there is no need to beat it with a hammer as there may be threaded holes that you can force bolts through and then release the caliper.
Install new Rotor
Before you start installing a new rotor, take off the rust of the hub with the help of a wire brush. This would prevent corrosion in future. When you are installing a new rotor, you must use a lug nut and an open ended wrench to secure it. Tighten the rest of the components.
Assemble carrier
All the carrier bolts should be replaced and then should be tightened down.
Compress the caliper
Use a C-clamp and old brake pads, and then compress the caliper piston. To avoid risk, make sure to have the cap off the brake reservoir.
Install pads and caliper
The next step is to install the pads in the carrier and then use a little bit of anti squeal grease on the outside of the pad as this would ensure a smooth operation. Carefully install all the caliper bolts. Tighten all the bolts and check if anything is left.
Put on wheels
This is a major step and indeed an easy one. All you have to do is to just tighten the lugs with the help of a wrench or you can even use a breaker bar. Repeat this process for all the 4 wheels.
Break in Pads and Braking System
During the first few miles you may experience some sort noise. Don’t worry it is extremely normal. If you are on highway, then you can accelerate more and you can gradually slow down your speed and repeat this process a few times. After that just drive normally and listen if there are any odd noises. If everything is going well, then it means that you have replaced your brakes perfectly.
If you are willing to change your car brakes all by yourself and want to buy new ones, then all you have to do is to visit our online auto parts store - https://partsavatar.ca/. We care for our customers and that’s why we offer the best quality of products at affordable prices.
Reference

Chevrolet Volt Premier - Run smooth, silent and green! Don't have a new green car yet? Tune up your emissions with better parts

Still driving a Polluting Gas Guzzler? See the new 2017 Chevrolet Volt Premier- Runs cheap, silent and clean


 Chevrolet is making its place in the hybrid world by introducing electric driving cars that will be travelling 200 miles or more per charge. Cars are not solely battery operated, but if the battery gets tapped, fuel or gasoline takes charge.You can then forget about your gas burning engine and polluting car exhaust fumes! Everyone wants to have a good, smooth experience of hybrid electric car and Chevrolet 2017 volt provides this without any refueling drawbacks.
It is a flexible and user friendly car. You will get 106 MPGe from volt typically or 42 MPG on gas. 

You can choose mode of driving as
Normalmode (uses battery first, then gas)
Sport (profligate with power when you hit the accelerator)
Mountain (more efficient at greater inclines)
Holdmode (changes instantly to gas mode saving battery’s charge for later on)

Electric range is the primary reason of buying a hybrid car. Compared to volt’s 53 miles, other hybrid cars like Ford Fusion Energi, Kia Optima PHEV are not in same league because volt is blended plug in hybrid i.e. it is EREV.

For the hybrid world, volt is standing at number one position due to its performance efficiency compared to other automobile companies. General motors is serious about efficiency.
To date, volt’s EV range is unmatched by blended computers. The car is able to stay in EV mode for full speed acceleration with zero emissions. This EV is equipped with 2.4 G gas tank and its speed and power are limited in range extended mode especially in mountains.
Volt comes with sleek four door hatchback with 1.5 L four cylinder engine and two AC motors for propulsion.An 18.4 KWH battery pack runs down the volt’s spine inside T shaped box.
This review focuses on points that may help you to get a better idea about 2017 Chevrolet Volt.

EV DRIVING

As mentioned above, once the battery is tapped out, the 101 hp engine fires up to drive the front wheels and recharge lithium ion cells with the help of motors or generators. By punching console button you can change the mode to sport, mountain, hold or normal mode. Sport mode sharpens the throttle response. Mountain mode keeps the battery in reserve to help the engine ascend steep grades. Hold saves the battery for later use such as visiting cities where combustion engines are prohibited. The gas engine does not directly drive the wheels instead it creates electricity for electric motors in car.  Volt’s speed can be controlled in most situations using accelerator pedals. You can do this by dropping shift lever to L position.

Chevrolet volt premier costs $38445 which is equipped with leather seats, Bose8 speaker audio system , finishes aluminum wheels, wireless phone charging,  automatic parking assist, a heated outside mirror and an auto dimming inside mirror.

INTERIOR

Chevrolet is silent in action and provides a decent driving experience.  Steering is tight on the centre and quick to hunt down the apexes. Driving is firm but not painful. Dashboard gets soft touch plastic with 8 inch My link infotainment touch screen system installed which is quite responsive. This touch screen system supports both apple car play and android auto. You will have to spend $495 more for Chevrolet’s navigation system.  It also provides On star 4G LTE hotspot in it.
Volt’s cellular link allows checking its location, unlocking it and starting it.

Volt also provides two driver’s confidence packages for additional $495 as blind spot monitoring, rear cross traffic alerts and lane keep assist, low speed front automatic braking system, auto headlamps. These packages could be costly but they do provide good amount of safety.

volt is five seater vehicle. there is plenty of room under the hatch. Passengers could feel cramped in the backseat. Backseat space is 0.6 inches longer than first generation in legroom and 0.2 inches less on the head room. There is also 120V charging cable in the trunk which works with any regular household outlet and could take up to 13 hours for charging the battery. Better go for 240V level 2 charger that takes four and half hours to fully charge the battery. In cold conditions electric heating capacity of battery takes more energy than A/C and it can reduce its range by one third.


As for summer, volt gives its standard output of 53 miles without much problem. Basically, efficiency depends upon driver and its conditions.
The volt is a compact family car with space wise limitations. It is best for one or two people day to day or those with kids. Outboard occupants ride with their noggins under the hatch glass and their knees rubbing the front seat backs.

One can also do close comparisons with tools by U.S. EPA’s fueleconomy.gov which lets one look at mpg, electric range,tailpipe emissions and upstream average.
Despite volt’s eco image, it is fun to drive. Its gasoline hybrid power engine provides better acceleration and greater efficiency. The all electric range is 53 miles after which the gas starts up to recharge the battery. For hybrid loving people, volt is the number one choice.

If Chevrolet Volt was not in your wish list, then you may add it definitely. If you are looking for Chevrolet Auto Parts then click on Partsavatar.ca for lucrative offers.

Ensure your car's safety by deploying TPMS in the tires. For more after market auto parts visit partsavatar.ca

Tires are under inflated? Ensure your safety on the road by deploying TPMS.
Car's Tire pressure monitoring system or TPMS monitors the pressure in the tire with the help of a wheel mounted sensor. Tire pressure monitoring systems have been a legal requirement on new cars since 2012. The sole purpose of these systems is to warn you if your tires are under inflated. The under inflated tires often offer a less stable ride and there are more prone to possible blowouts. The warning prompts the driver to inflate the tires to proper level. Drivers are advised to keep their vehicle’s tires inflated to the level indicated on tire placard.  You can easily locate placard on door jamb or glove box. TPMS often avoids major fatalities that could happen on high traffic roads or bad weather locations.

TPMS comes in different systems as direct and indirect TPMS. Let us know about these systems in detail.

INDIRECT TPMS

The circumference of under inflated tire is small. Therefore, Indirect TPMS of car uses existing individual wheel speed hardware.  This hardware supplies car’s anti lock and anti skid control functions in addition. This hardware identifies a pressure drop and alerts the driver through either illuminated fascia light or an on dash message.

Indirect TPMS relies on wheel speed sensors used by anti lock brake systems. The rate of revolution of the wheel could help the system to detect relative size of tires. An under inflated tire also causes a wheel to spin faster than usual, thus if detected, computer would generate a warning for it.
So, indirect TPMS don’t use electronic processing or any kind of instrument to detect the tire pressure. They just create their results of pressure detection on the basis of rotation of tire. Sometimes if a new tire is installed in a vehicle, it could relatively generate false rotation rate so sometimes the results of indirect TPMS may be inaccurate. These systems are less expensive than Direct TPMS but at the same time they are less precise as compared to direct one.  Less maintenance is required for indirect TPMS but this system has to be reset after every tire rotation or inflation.

DIRECT TPMS

Direct TPMS employs a sensor in each wheel and communicates with a separate transmitter. The Car's TPMSsensors employed can also provide tire temperature readings. This system sends the data to centralized control module where it is interpreted and analyzed. The indicator light illuminates as a signal for warning that your vehicle’s tire pressure is low. System easily distinguishes between the readings of each tire of the vehicle because each sensor is provided with a unique serial number. Though Direct TPMS is more accurate and popular as compared to Indirect TPMS, it requires more maintenance and is cost effective. Another advantage to this system is its battery is quite long lasting and there is no need to reset. It is a wireless system.

If there is some problem with the battery of the sensor, then this might not be good news because batteries are unserviceable and you will have to change the whole sensor. The sensor stem is also prone to damage basically in case of accidents.

MAINTENANCE AND REPAIR REQUIREMENTS

1. An integral battery is sealed within each sensor. Each battery has a design life of about 10 years or 100,000 miles. If one battery gets depleted the entire system has to be changed. The new part needs to be activated and then coded to the vehicle. This is quite time consuming and requires costly tools which are $140 per wheel.

2. Most sensors need a service kit that includes new sealing washers as well as replacement TPMS valve of car core. The whole sensor is not needed to be replaced whenever the tire is removed. Plastic caps are often used to protect core and sensor internals whenever the sensor is dismounted.

3. Corrosion also affects a sensor by damaging the stem causing small air leaks or complete deflation. But stems can be easily replaced without undergoing replacement of sensor because stems are affixed by small screws. If a TPMS sensor has been damaged by careless tire fitter, then it must be replaced immediately.

4. If your system detects fault, then you may need to replace your sensor.  By disabling TPMS, we cannot modify the sensors because it could alter car’s security system as well. So better have it changed than following a cheap route.

5.  The genuine OE sensors are less costly as compared to other sensors. Buying a genuine replacement sensor may be a viable option. You can also fit a good quality replacement sensor that can be programmed with old sensor’s unique identifier.

6. When the warning sign illuminates while driving, it means system has detected a tire low pressure than standard. As soon as the warning is generated, the tires should be inspected. When the tires are properly inflated, the warning lamp will automatically extinguish.

7. Experts say that 25 % of the vehicles have under inflated tires. Inflated tire not only results in poor driving experience or unsteady ride but also cause poor fuel economy, small tire life and longer braking distances.

8. It may be necessary to reprogram the TPMS when the sensor is installed or tires are rotated.

9.  Proper wheel alignment adjusts the angle of wheels thus correctly positioning the vehicle’s frame and  maximizing tire’s life

10. Tire must be replaced if tread depth is measured 2/32nds of an inch or less.
For more safety and TPMS equipments visit partsavatar.ca which deals in best auto parts across Canada.

Partsavatar.ca - Get All 2015 Acura TLX Parts

Find Best 2015 Acura TLX Parts Online at Parts Avatar Canada Acura likes to tout tech as the selling point of its mod...